How to add a new project?
In your space, click on the green + to add a new project. Give your project a name, choose the template form, add tags (if you have or think it might be useful), and add a logo.
At this point, you can even create the Teams of your project (for example, Accounting, Marketing, Sales, Testing, Frontend, Backend, etc.). All the teams you create at this point will be listed in the Teams section, in the main menu.
Next, select a tag or add a new one. To add a new tag just write the name of the tag and click Select.
Don’t forget to click Create project to save and ….create your newest project. Or Cancel if you change your mind.
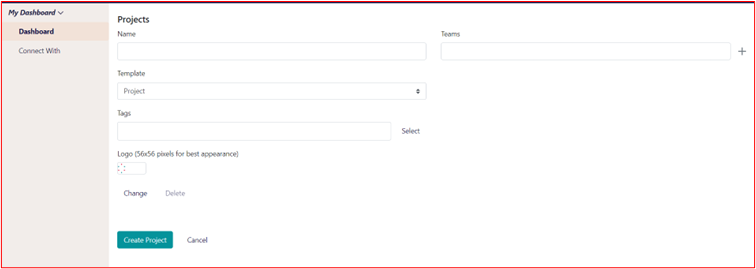
Figure 2
When you create a new project, you have the option to choose from a:
- Standard view (Figure 3) of the tasks or
- Kanban view (Figure 4)
Choose whatever is more helpful in your project, you can do that only if you are the admin or the space owner and cannot change the layout in the middle of the project.
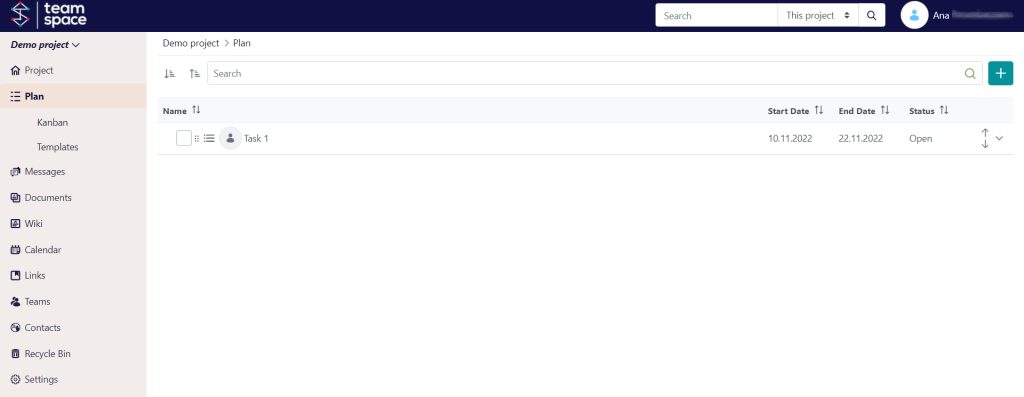 Figure 3
 Figure 4
Once you have created a project in TeamSpace, you can start planning your project.
Start by adding tasks and subtasks, what needs to be done, as well as assigning, managing, and editing every entry in the Plan section. Is a great feature to notify team members of a specific assignment that needs to be completed, along with information about the task and other details (images, tables, etc.)
How to manage tasks using the Standard view?
How to add a task using the Standard view?
Here’s how to add a new task in the Plan section using the standard view: go to the project’s menu, and click on Plan. Next, click on the + sign on the right part of the screen. A new page opens where you must add the details:
Parent name: name of the root, where the task//subtask is created. If you have more, you will be able to change the parent.
Task type: Subtask or a User story
Description: Give a description of the task or add any other valuable information for the assignee.
Templates: here you can choose from all your already saved templates for your task//subtask. If you do not have any templates, you’ll have nothing to choose from, until you add one.
Members and rights: update (to update the selected user), permissions (to allow the selected user to edit, but also to change access rights), notify (notify via email the selected user)
Task status: choose the status of your task, open or closed
Assigned to: any member of the team
Start date: choose the start date of the task
End date: choose the end date of the task
For the start date and the end date, you have cool shortcuts to help you choose in a fast and easy way the deadline. You get to choose from: today, +1day, +7 days, or even no date. Just click on what suits you best, or click inside the field and choose from the calendar.
Calendar event: by clicking on the Calendar event, you can add your task to the Calendar.
Milestone: when you create a task you can mark it as a milestone. The Milestone section offers you a fast overview of all the milestones within a project. They let everyone see progress and assess priorities, which helps to inspire and align your team. Additionally, they support you in keeping track of deadlines, identifying important dates, and recognizing potential project bottlenecks.
Template: this is a very useful option. It allows you to save the task as a template for future use. This way you don’t have to create and recreate older tasks, you have now…template feature in Team Space. Enjoy! After you save it as a template, you’ll find your new template in the Templates section (Plan – > Templates, as in Figure 5)
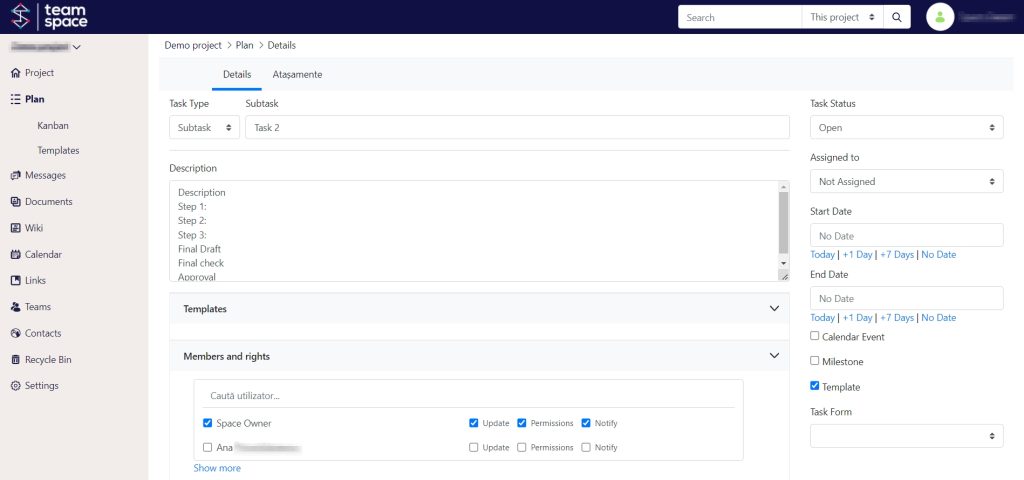 Figure 5
Task form: the admin//owner of the space has the permission to define a form and allow other users to add that form to a certain task//subtask.
On the horizontal menu, in the Attachments section, you can add any document, files, or images you need for that task or subtask.
After you have completed all the fields and attachments, don’t forget to click Save.
Here are all options that come with a task or subtask in the Standard view:
- Add (new task or/and subtask): add a new task//subtask
- Edit: edit the task//subtask
- Pin to menu: no more searching, now a pinned item is easy to reach
- Save as template: save the task//subtask as a template for further use
- Permissions: an extremely useful setup that allows the task//subtask owner to set permissions for roles, teams, and users.
- Propagate permissions: submit if you want to propagate permissions
- Propagate subscriptions: submit if you want to propagate subscriptions
- Attachments: see all the attached files, folders, and images within a task//subtask
- Move: move a task to another root
- Delete: delete a task//subtask. No worries it will not delete it as you press the delete button, it will ask you if you are sure 😊, just in case you decide not to do it.
How to edit a task using the Standard view?
To edit an existing task, click on it. Next, click on Edit and make the necessary changes. Click Save.
Or you can click on the downward arrow on the right side of the screen, then click Edit, and make the necessary changes (see this step in Figure 6).
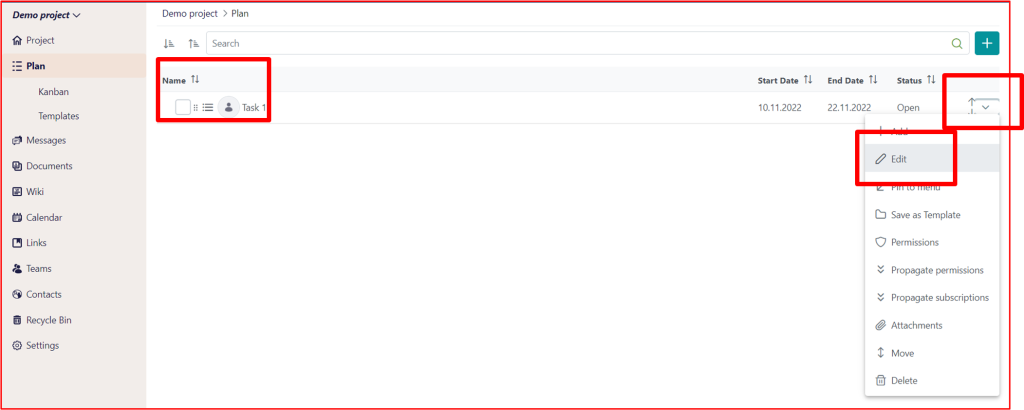 Figure 6
You can update the task status to let team members see what’s been done and what’s up next. Just click on a task, and at the Task status field choose the appropriate status. You can choose from Open, In Progress, or Closed. To reopen a task, click on the Task status field, and choose Open or In Progress.
How to add a subtask?
Inside a task, you can add as many subtasks as you need. Just click on the downward arrow on the right side of the screen and click Add. Next, all you have to do is fill in the necessary fields and save.
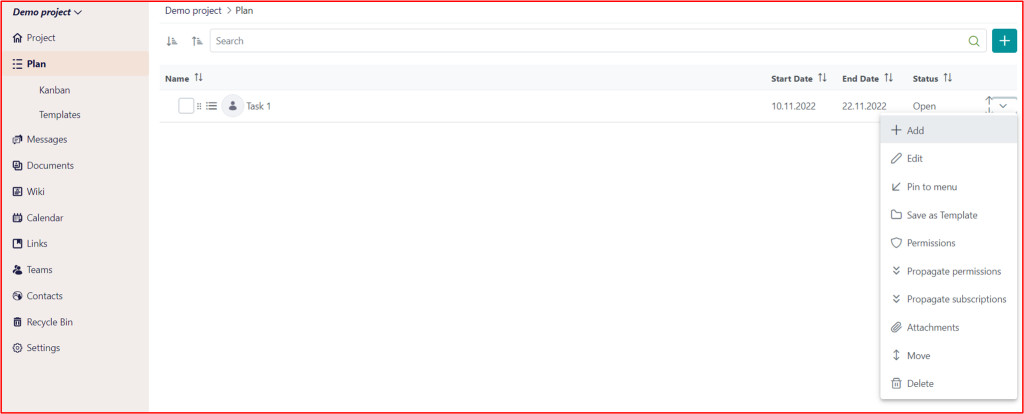 Figure 7
How to filter and order tasks?
To filter your tasks please choose one of the following options: ascending or descending filters (next to the search bar, on the left side of the screen), Start Date, End Date, or Status.
You can also drag and drop a task//subtask to move it anywhere you need it to be, for example from folder 1 to folder 3.
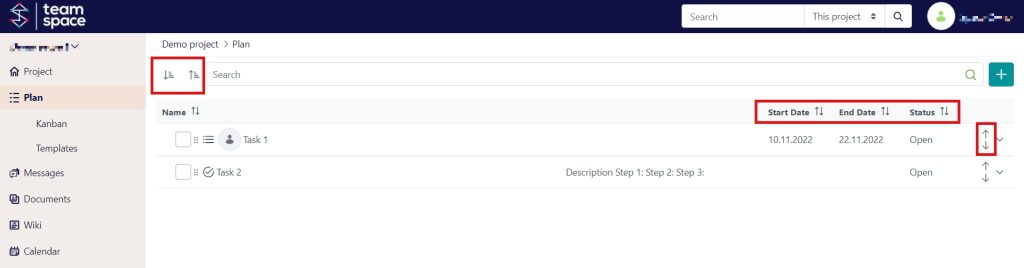 Figure 8
How to manage tasks using the Kanban view?
Work items are represented visually on a Kanban board, allowing team members to see the state of every piece of work at any time.
Kanban boards use cards, columns, and continuous improvement to help technology and service teams commit to the right amount of work, and get it done!
How to add a user story using the Kanban view?
To add a new user story using the Kanban view you can:
- Add new column(s): just press the +New column button, give a name to the column (Open, In Progress, Closed, Archive, etc) and click Submit. Each column has three icons:
- Green: add a new user story, by clicking the plus icon.
- Blue: edit the user story by clicking the pen icon.
- Red: delete the column by clicking the trash icon.
- Add new user story: click the green plus to add a new story
How to edit//update a task in the Kanban view?
To edit or update a task in Kanban, just click the pencil icon. O new window opens, where you can see or edit things like the description, assign it to somebody, status, start date, end date.

Figure 9
Later, you can move the story to another column, from open, to in progress, done, or archive it. You can add as many columns as you need: new, in progress, on hold, done, questions, archive, etc.