Add Team Member
It is a known truth that a project’s success depends on its team. While skill and ability are essential for success, it is arguably even more important that they can communicate effectively and efficiently with one another.
The Contacts entry in the menu represents a single source of truth for all your contacts and the users within a project. It’s a useful way to find quickly all the information you want about a team member from the name, to the email and the organization he/she represents, and an easy way to update contacts’ information.
How to add a contact to a project?
You can add people to your space created in TeamSpace or to your projects. To see a project and have access, you have to be a member of a project. If you are a project owner and want to create a project team, you have to add people (members) to a project.
Remember: If you are not a member of a project, you will not see the project in the project list.
- How to add existing members?
To add existing people to a project, select the project to which you want to add members. In the project menu, select the Contacts menu item and then click on the + (Add). Next, you will get an overview of the current members’ list.
Members with a check mark are already part of the team project.
To add a new member from your existing list all you have to do is check on the left side of the member’s entry. You can add one or multiple members at once. Click Done to add the members you chose to your project.
- How to invite new members?
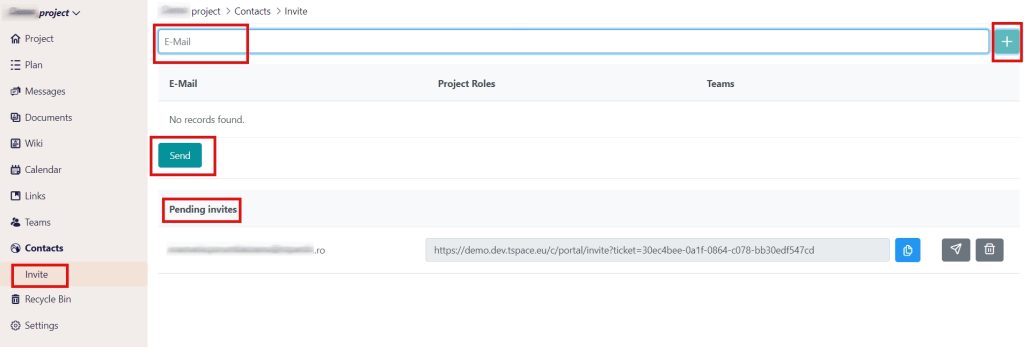
You can also invite new members who do not yet have a TeamSpace account, but for now, only the project owner//manager has this permission. To do that, select the project to which you want to add members. Next, select the Contacts menu item and then click on the Invite users on the left side of your screen.
Add an email and then click Add. Next, you need to choose from Project roles (the role of the invited user in a project and Project team (the project in which the invited user will take part).
Remember: You can invite one or multiple users to have the same role.
An e-mail invitation will be sent out to the user with a link to create an account for TeamSpace. You can now collaborate with your team in TeamSpace!
To see more details about a member, click on the arrow on the right of a member’s entry.
How to edit, remove or deactivate a member from a project?
As a project owner, you’ll get to edit, remove the contact from the project or deactivate the member from the team/project.
To remove a member from a project, select the project where you want to remove the member. In the project menu, select the Contacts menu item. On a member card, click on the arrow in line with the member’s name. Select Remove the contact from the project and click.
